Battery switch on travel trailer function is crucial for managing your RV’s power. Understanding how your battery switch works is key to preventing electrical issues and maximizing your battery life. This guide will walk you through the different types of switches, how to operate them safely, and what to do when things go wrong. We’ll cover everything from basic operation to troubleshooting and maintenance, ensuring you’re confident in handling your travel trailer’s electrical system.
We’ll explore various switch types, from simple on/off to more complex configurations, outlining their pros and cons. We’ll also delve into the step-by-step procedures for safe operation, including best practices to avoid accidental disconnections or damage. The interaction between your battery switch and other electrical components like solar panels and inverters will be clarified, along with safety tips and maintenance routines for long-term functionality.
Types of Battery Switches in Travel Trailers: Battery Switch On Travel Trailer Function
Choosing the right battery switch for your travel trailer is crucial for managing your power sources efficiently and safely. Different types offer varying levels of control and complexity, each with its own set of advantages and disadvantages. Understanding these differences will help you select the best option for your needs.
Battery Switch Types and Their Functionality
Travel trailers typically use battery switches to isolate and control the flow of power from different battery banks (e.g., a house battery and a starting battery). Common types include 1-2-Both switches, 1-2-Off switches, and rotary switches. Each offers a unique way to manage power.
1-2-Both Switches
These switches are simple and straightforward. They allow you to select either battery 1 (typically the house battery), battery 2 (usually the starting battery), or both simultaneously. This is a good option for basic power management needs.
1-2-Off Switches
Similar to 1-2-Both switches, these offer the ability to select either battery 1 or battery 2, but they also include an “off” position to completely disconnect both batteries. This is a key safety feature, preventing accidental drains and potential short circuits.
Rotary Switches
Rotary switches provide more granular control, often offering multiple positions beyond simply selecting individual batteries or both. Some advanced rotary switches might include additional positions for charging control or connecting to shore power. They often come with clearer labeling and are generally considered more user-friendly.
Comparison of Battery Switch Types
| Switch Type | Functionality | Pros | Cons |
|---|---|---|---|
| 1-2-Both | Selects Battery 1, Battery 2, or Both | Simple, inexpensive, easy to understand | Lacks an “off” position for complete disconnection; potential for accidental battery drain |
| 1-2-Off | Selects Battery 1, Battery 2, or Off | Simple, includes a safety “off” position, inexpensive | Limited control compared to rotary switches |
| Rotary | Variable, depending on the specific switch; can include multiple positions for battery selection, charging control, etc. | More versatile, often includes clearer labeling and better user interface, increased safety features | More expensive than simpler switches, can be more complex to understand |
Battery Switch Operation and Procedures
Understanding your travel trailer’s battery switch is crucial for managing power and preventing problems. This section details the operation of a typical 1-2-Both switch and provides best practices for safe and efficient use. Proper operation ensures you get the most out of your batteries and avoid costly mistakes.
A typical 1-2-Both battery switch allows you to select which battery (or both) powers your trailer’s 12-volt system. The switch usually has three positions: “1” (battery 1 only), “2” (battery 2 only), and “Both” (both batteries in parallel). Understanding these positions is key to managing your power sources effectively.
So, you’re an audiophile who travels? Awesome! Check out this guide on audiophile travel setups for tips on keeping your sound quality high on the go. It covers everything from portable DACs to noise-canceling headphones. Then, for a different perspective, explore audiophile travel setups focusing on lightweight and durable equipment perfect for backpacking adventures.
Remember, good sound doesn’t have to stay home!
Operating a 1-2-Both Battery Switch
Operating the switch is straightforward, but paying attention to detail is vital. Incorrect operation can lead to unexpected power loss or damage to your batteries or electrical system.
- Identify your batteries: Before operating the switch, locate your batteries and determine which is battery 1 and which is battery 2. This is usually clearly marked on the switch itself or near the battery terminals.
- Assess your power needs: Determine which battery or batteries you need to power your trailer. If you’re only using minimal power (e.g., interior lights), using a single battery conserves power and extends its lifespan. For high-power demands (e.g., air conditioning), utilizing both batteries in parallel provides more power.
- Turn the switch to the desired position: Carefully rotate the switch to the appropriate position (“1,” “2,” or “Both”). Ensure the switch clicks firmly into place. A loose switch could cause intermittent power or potential damage.
- Verify power: After changing the switch position, check that the appropriate circuits are powered. For example, if the switch is in the “1” position, only appliances connected to battery 1 should function. This verification step helps prevent issues resulting from incorrect switch operation.
Best Practices for Battery Switch Usage
Following these best practices minimizes the risk of accidental disconnections or damage to your battery system.
- Always turn off all appliances before changing the switch position. This prevents power surges and protects sensitive electronics.
- Avoid rapidly switching between positions. This can generate sparks and potentially damage the switch.
- Regularly inspect the switch for any signs of damage or corrosion. Clean the terminals and connections as needed.
- If you notice any unusual smells or sounds coming from the switch, immediately stop using it and have it inspected by a qualified technician.
- When storing your travel trailer for extended periods, turn the switch to the “Off” position (if applicable) to prevent battery drain.
Understanding Switch Position and its Impact on Charging and Usage
The position of the battery switch directly affects how your batteries are charged and used.
When the switch is in the “1” or “2” position, only the selected battery powers the trailer’s 12-volt system. The other battery is isolated and will only charge if connected to a charging source (like a shore power connection or solar panel) separately. When the switch is in the “Both” position, both batteries work together to power the system.
In this configuration, both batteries charge simultaneously when connected to a charging source. The charging current is distributed between both batteries, potentially leading to slower charging per battery compared to charging each individually. This however provides more power overall.
Troubleshooting Common Battery Switch Issues
Dealing with a faulty battery switch in your travel trailer can be frustrating, leaving you without power when you need it most. Fortunately, most problems are relatively straightforward to diagnose and fix with some basic troubleshooting. Let’s explore some common issues and how to tackle them.
Battery switch problems usually stem from a few key areas: corrosion, loose connections, or a failed switch itself. These issues can prevent proper power flow to your trailer’s batteries or appliances, leading to a dead system. Regular inspection and preventative maintenance can significantly reduce the likelihood of these problems.
Corrosion Inspection and Cleaning
Corrosion is a frequent culprit in battery switch malfunctions. Acidic battery fumes can react with metal components, creating a buildup of white or green residue that inhibits electrical conductivity. A visual inspection is the first step. Carefully examine the terminals and connections on both sides of the switch, looking for any signs of corrosion. If corrosion is present, use a wire brush or sandpaper to clean the affected areas, ensuring a clean, metallic surface.
After cleaning, apply a corrosion inhibitor or dielectric grease to prevent future buildup. This simple process can often restore proper function.
Loose Connections and Tightening, Battery switch on travel trailer function
Loose connections, another common problem, can cause intermittent power or complete failure. Vibration during travel can loosen nuts and bolts, interrupting the electrical circuit. Check all connections at the battery switch, including the battery cables themselves. Tighten any loose connections securely with the appropriate wrench. If any wires appear damaged or frayed, replace them immediately.
Ensure that all connections are clean and tight before testing the system. It’s good practice to regularly check for loose connections as part of routine maintenance.
Battery Switch Functionality Test
If cleaning and tightening connections don’t resolve the issue, the switch itself might be faulty. A simple test can determine if the switch is working correctly. With the switch in the “off” position, use a multimeter to check for continuity across the switch terminals. There should be no continuity. Then, switch the switch to the “on” position and check for continuity again; continuity should be present.
If continuity is present when the switch is off or absent when on, the switch needs replacement. This indicates the switch’s internal mechanism is compromised and requires replacement. Always disconnect the battery negative terminal before performing any electrical tests.
So, you’re an audiophile who travels? Awesome! Check out this guide on audiophile travel setups for tips on packing your precious gear. It’s all about finding the right balance between portability and sound quality. Then, if you’re planning a more adventurous trip, consider this other resource on audiophile travel setups – it focuses on robust solutions for less-than-ideal listening environments.
Remember, good sound doesn’t have to stay home!
Troubleshooting Flowchart
The following flowchart provides a step-by-step guide to troubleshoot a non-functioning battery switch:
Start -> Inspect for corrosion -> Clean corrosion if present -> Check for loose connections -> Tighten loose connections -> Test switch functionality with a multimeter -> Replace switch if faulty -> End
Battery Switch and Electrical System Integration
Your travel trailer’s battery switch isn’t an isolated component; it’s the central nervous system for managing power flow. Understanding its interaction with other electrical systems is crucial for safe and efficient operation. This section will clarify how the battery switch works in conjunction with solar panels, converters, inverters, and other appliances.The battery switch acts as the main control point for the 12-volt DC power system in your RV.
It determines which batteries (house or chassis) supply power to your appliances and systems, and, importantly, prevents accidental draining of one battery by the other. It allows you to isolate batteries for maintenance or charging, and also plays a key role in managing power from alternative sources.
Power Distribution and Appliance Control
The battery switch directly influences which appliances receive power. With the switch in the “house” position, the house batteries power the interior lights, water pump, refrigerator (if 12V), and other 12V appliances. Switching to the “both” position allows both house and chassis batteries to power these appliances, providing more capacity. The “off” position disconnects both batteries, preventing drain.
The “chassis” position typically powers only the chassis systems (like brakes, lights, and other essential vehicle functions). This precise control avoids unintended discharge of your house batteries, which could leave you stranded.
Interaction with Solar Panels
Solar panels generate DC power. Depending on your setup, this power might charge your house batteries directly, or it might feed into a charge controller first. The battery switch doesn’t directly control the solar panel’s output, but it does control how that power is used. If the switch is in the “off” position, the solar panels won’t be able to power any house appliances, although they might still charge the house batteries (depending on the solar panel setup).
Interaction with the Converter
The converter transforms 120-volt AC power (from the shore power connection or generator) into 12-volt DC power to charge the batteries. The battery switch doesn’t control the converter itself, but it determines where the converter’s charging output goes. With the switch “on” (either “house” or “both”), the converter charges the selected batteries. Turning the switch to “off” stops the charging process, but the converter itself remains functional and ready for use when the switch is turned back on.
Interaction with the Inverter
The inverter converts 12-volt DC power from the batteries into 120-volt AC power for running AC appliances. The battery switch controls the DC power source for the inverter. If the switch is “off”, the inverter will not have a power source and will not be able to generate AC power. The “house” or “both” positions supply the inverter with power, allowing you to run your AC appliances.
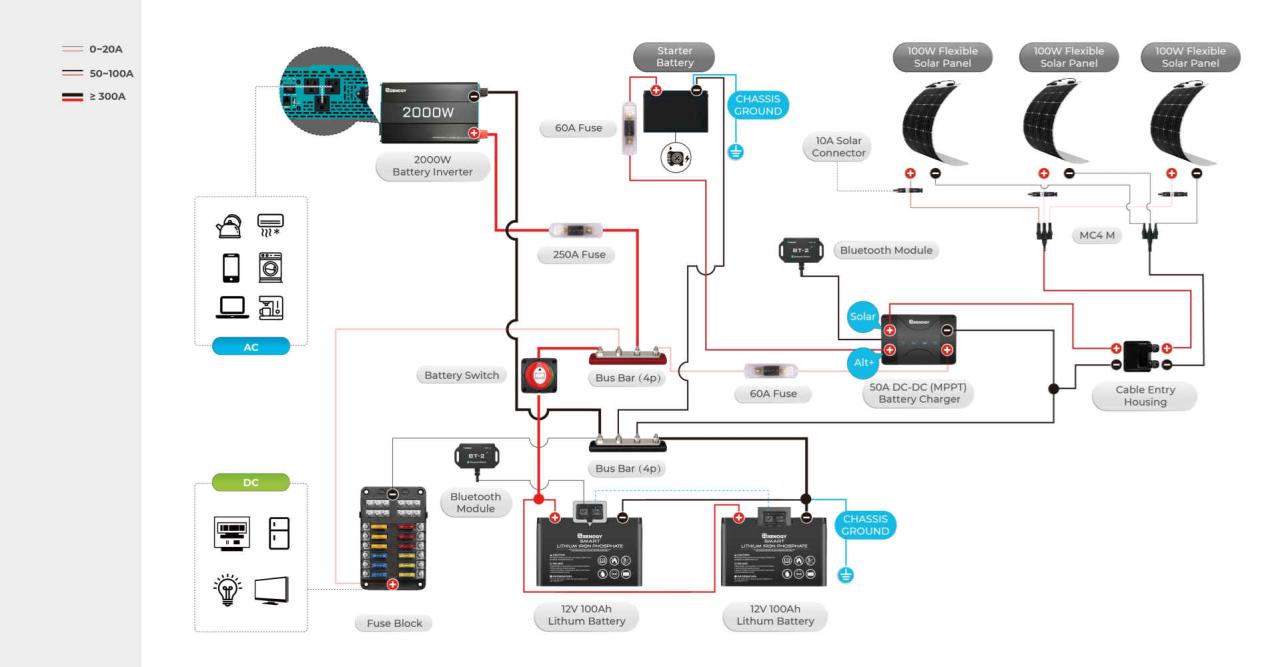
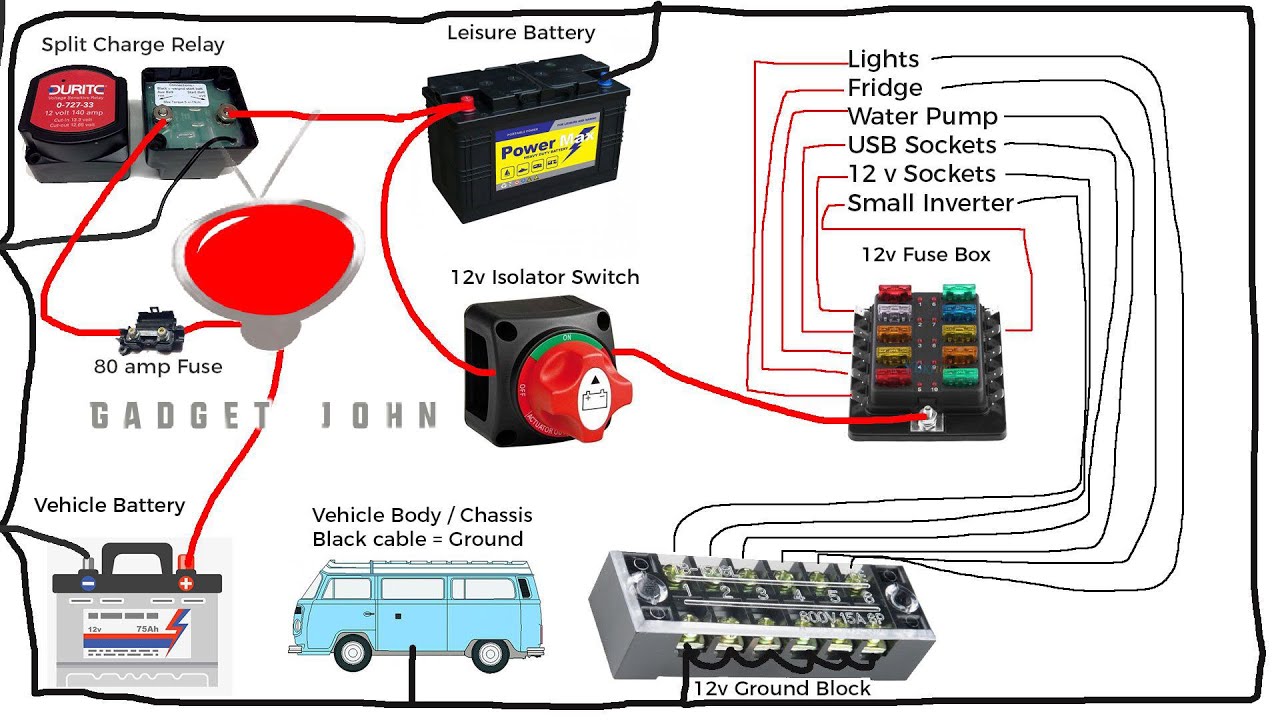
Diagram of Electrical System Flow
Imagine a simple diagram. We’ll start with the power sources:
1. Solar Panels
These feed into a charge controller (represented by a box labeled “Charge Controller”).
2. Shore Power/Generator
This connects directly to the converter (represented by a box labeled “Converter”).
3. House Batteries
These are represented by a box labeled “House Batteries”.
4. Chassis Batteries
These are represented by a box labeled “Chassis Batteries”.
5. Battery Switch
A central switch with three positions: “House,” “Both,” and “Off”. This switch controls the flow of power to the various components.
6. Inverter
A box labeled “Inverter” that takes 12V DC and converts it to 120V AC.
7. Appliances
A box labeled “Appliances” representing the various 12V and 120V appliances in the trailer.The arrows show the direction of power flow. The Charge Controller sends power to the House Batteries. The Converter charges the House Batteries (or both if the switch is in the “Both” position). The Battery Switch controls the flow from the House and/or Chassis Batteries to the Appliances and Inverter.
The Inverter converts the DC power to AC power for the Appliances.
Safety Considerations with Battery Switches
Working with a travel trailer’s battery system involves direct current (DC) electricity, which presents unique safety hazards compared to household alternating current (AC). Understanding and adhering to safety precautions is crucial to prevent accidents and injuries. Improper handling can lead to electric shocks, burns, explosions, and even fire.Proper safety measures minimize these risks significantly. Remember, even seemingly low voltages can be dangerous if handled incorrectly.
Always treat the battery system with respect and follow established safety protocols.
Working Safely with DC Power
DC power, while less commonly encountered in daily life than AC power, can still deliver a dangerous shock. The effects of a DC shock can be particularly severe because it’s less likely to cause the muscles to involuntarily release their grip on the source of the shock. This means that a person might be unable to let go of a live wire, prolonging exposure.
Always approach battery work with caution and respect for the potential dangers. Ensure that you have a solid understanding of the system before beginning any work.
Preventing Electrical Shocks and Other Hazards
Several simple steps can significantly reduce the risk of electrical shocks and other hazards when working with your travel trailer’s battery switch. These measures ensure both your safety and the longevity of your electrical system. Always disconnect the negative (-) battery terminal before performing any work on the system, and use insulated tools to avoid accidental contact.
- Always wear safety glasses to protect your eyes from sparks or acid splashes.
- Use insulated tools with insulated handles to prevent accidental contact with live wires.
- Never work on the battery system while it’s raining or in damp conditions.
- Disconnect the negative (-) battery terminal first before working on any part of the system. Reconnect the positive (+) terminal last.
- Have a fire extinguisher readily available, preferably a type ABC extinguisher, in case of a fire.
- Ensure adequate ventilation when working near batteries, as they release hydrogen gas, which is flammable and explosive.
- Wear gloves to protect your hands from acid burns or cuts from sharp battery terminals.
- If you’re unsure about any aspect of the procedure, consult a qualified electrician.
- Never touch both battery terminals simultaneously. This could create a short circuit and cause serious injury or damage.
- Inspect all connections regularly for corrosion and tightness. Loose or corroded connections can lead to overheating and fire hazards.
Maintenance and Replacement of Battery Switches
Keeping your travel trailer’s battery switch in top condition is crucial for reliable power and preventing costly repairs down the road. Regular maintenance ensures optimal performance and extends the lifespan of your switch, saving you time and money in the long run. Neglecting maintenance can lead to corrosion, poor connections, and ultimately, switch failure.Regular inspection and cleaning are key to preventing problems before they arise.
This section details a recommended maintenance schedule and provides step-by-step instructions for replacing a faulty switch and cleaning corroded terminals.
Battery Switch Maintenance Schedule
A proactive approach to maintenance significantly reduces the likelihood of battery switch issues. The following schedule Artikels recommended checks and cleaning:
- Monthly Inspection: Visually inspect the switch and its connections for any signs of corrosion, loose wires, or damage. Pay close attention to the terminals for any signs of green or white powdery buildup.
- Semi-Annual Cleaning: Clean the battery switch terminals and connections every six months, or more frequently if you notice any corrosion. This involves carefully removing any corrosion and applying a corrosion inhibitor.
- Annual Thorough Inspection: Once a year, conduct a more thorough inspection, checking for any signs of wear and tear on the switch itself. Tighten any loose connections and consider replacing the switch if you notice any significant damage or if it’s showing signs of excessive wear after several years of use.
Replacing a Faulty Battery Switch
Replacing a battery switch is a relatively straightforward process, but it’s crucial to disconnect the battery before beginning any work to prevent electrical shocks.
- Disconnect the Battery: Disconnect the negative (-) terminal of your battery first, then the positive (+) terminal. This is a critical safety precaution.
- Remove the Old Switch: Carefully remove the old battery switch from its mounting location. Take note of the wiring configuration before disconnecting any wires. Take pictures if necessary.
- Install the New Switch: Mount the new battery switch in the same location as the old one. Ensure that it’s securely fastened.
- Reconnect the Wires: Connect the wires to the new switch, matching the configuration of the old switch. Double-check your connections to ensure accuracy.
- Reconnect the Battery: Reconnect the battery terminals, connecting the positive (+) terminal first, then the negative (-) terminal.
- Test the Switch: Test the new battery switch to ensure it’s functioning correctly. Check all battery banks to confirm that they switch on and off as expected.
Cleaning Corroded Battery Switch Terminals
Corrosion on battery terminals is a common problem, leading to poor connections and reduced performance. Regular cleaning helps maintain optimal conductivity.
- Disconnect the Battery: Always disconnect the battery’s negative (-) terminal first, then the positive (+) terminal before cleaning any terminals.
- Prepare Cleaning Solution: A baking soda and water paste is an effective and safe cleaning solution. Mix baking soda with water to form a thick paste.
- Apply the Paste: Apply the baking soda paste to the corroded terminals. Use a wire brush or a stiff brush to gently scrub the terminals, removing the corrosion.
- Rinse and Dry: Rinse the terminals with clean water and thoroughly dry them with a clean cloth. Allow them to air dry completely before reconnecting the battery.
- Apply Corrosion Inhibitor: After cleaning and drying, apply a corrosion inhibitor (such as dielectric grease) to the terminals to prevent future corrosion.
- Reconnect the Battery: Reconnect the battery terminals, connecting the positive (+) terminal first, then the negative (-) terminal. Test the system to ensure proper function.
Mastering your travel trailer’s battery switch is essential for a smooth and safe RV experience. By understanding its function, operating procedures, and troubleshooting techniques, you can confidently manage your power, prevent costly repairs, and enjoy worry-free adventures. Remember to always prioritize safety when working with electrical systems. Regular maintenance checks and prompt attention to any issues will keep your battery switch functioning optimally for years to come, ensuring your off-grid adventures remain powered and enjoyable.
User Queries
What happens if I leave my battery switch in the “off” position?
Leaving the switch off completely disconnects your batteries from the trailer’s electrical system. This prevents power drain but also means no charging from the shore power or solar panels.
Can I use a different type of battery switch than what came with my trailer?
Yes, but ensure the replacement switch has the correct amperage rating for your system and is compatible with your battery type. Improperly sized switches can lead to overheating or failure.
How often should I inspect my battery switch for corrosion?
Inspect your battery switch and connections at least once a year, or more frequently if you use your trailer in harsh conditions (saltwater, etc.).
What should I do if my battery switch feels hot to the touch?
A hot battery switch indicates a problem, possibly a loose connection or a faulty switch. Turn off the switch immediately, disconnect power, and inspect for any issues. If unsure, consult a qualified RV technician.
